
Showing posts with label how to. Show all posts
Showing posts with label how to. Show all posts
Monday, January 28, 2019

Monday, December 17, 2018
Blueprint - 1x4 Deep Beehive Super

"A Goal without a plan is just a wish." - Antoine de Saint-Exupery (That's is my new favorite quote!)
As I mentioned in an earlier blog this super is built with 1x4's and cost about $9.50 to build. Using nine 1x4's 8' long will give you four deep supers with almost no waste.
Here again is how you cut them for optimal efficiency:
Cut Board One: (3) 19 7/8" and (2) 14 3/4"
Cut Board Two: (5) 14 3/4" and (1) 19 7/8"
Cut Board Three: (4) 19 7/8" and (1) 14 3/4"
Then repeat two more times.
Keep the scraps for handles.
You will also need a scarp of wood to make the (3/8 x 5/8 x 16 1/4") end strips.
One thing I did different this weekend was that I bought some untreated cedar fence slats for the end strips. They were about 6' long 6" wide and 11/16" thick. I planed them down to 3/8" using my table saw (in what was obviously an unsafe manner). Then I cut them into 5/8" strips and cut them down to length.
It's a small bit of wood but maybe the cedar will keep the moths out.
Helpful tip: If you are fighting your saw, it might be time for a new blade.
While cutting the cedar, I felt like I was date raping my saw. On inspection, I found that the 5-yo (overused) blade was missing the carbide tips on some of the teeth (or at least they were worn to nearly nothing). I replaced the blade and it cut like butter. I know I should have known better but it's not like you have to replace the blade that often.
If you like the plan or use it, leave a comment and let me know how it worked out for you.
Monday, December 3, 2018
Cheaper, Stronger, Easier Beehive

If you've read my blog at all, you probably know just how cheap I really am. When I started to rebuild my apiary, I started off repairing old rotted boxes. When I ran out the old boxes, I began building boxes from pallets.
Eventually it became a point of pride that I could build my business without taking money from my household budget.
Now that my hives are making a little money, I am reinvesting it. I have finally upgraded to building hives with "store-bought" lumber but 1X12-8' are more than $16 each and only make a single super.
So capitalizing on the lessons learned building hives from pallets, I am sticking with 1X4-8'. If you buy nine 1X4's you can make four deep supers. This is the cutting pattern for minimal waste:

 Cut Board One: (3) 19 7/8" and (2) 14 3/4"
Cut Board Two: (5) 14 3/4" and (1) 19 7/8"
Cut Board Three: (4) 19 7/8" and (1) 14 3/4"
You will have to stagger your joints. I found a really easy way to do this. Using some scrap wood, cut two strips per super that are 3/8" X 5/8" X 16 1/4".
Next, on two of your 19 7/8" pieces cut a notch in both ends that is 3/8" X 5/8".

Assemble these two pieces to the strips. From here on all you have to do is glue and nail the rest of the boards in place.
When the whole thing is assembled. Set your table saw to 9 5/8" and trim the bottom of the super. This will make a nice square bottom. Lastly, place a handle 1X2-4" on each end of the box so that it overlaps the top two end boards.
That's it. It took me about an hour to build each super. I need 200 supers for next year, so that means 200 hours of work just on the boxes. I think a little part of me just died.
"The best time to plant a tree is 20 years ago. The next best time is now." - Chinese Proverb
Monday, November 19, 2018
Moth Prevention & Winter Preparations

I also placed a Fat Bee Man corrugated sign trap in each hive, as well as a swiffer sheet and beetle buster trap on the top bars. That's every trick in my bag.
After having the temperature dip into the 20's I thought I might have waited too late to winterize my hives. Luckily, I was blessed by God with a nice warm 67 degree day. Noah was working so I asked my 13-year-old nephew, Zane to help me out. He was a huge help and I wouldn't have gotten done without him.
 We staged all of the feeders and traps on top of each hive to minimize the amount of time each hive would be left open.
We then cleaned up the apiary and removed all the unused equipment - a full truckload (which might be part of my pest problem).
Lastly, we began placing the feeders. The first hive I opened was dead and filled with wax moths. I felt sick. The second hive looked good but then the third hive was dead. I could have thrown up!
With no other choice, I carried on. In the end, I lost three hives.
"Expect the best. Prepare for the worst. Capitalize on what comes." Zig Ziglar

Last month, when I extracted honey, I placed the empty supers back onto the hives in hopes that the bees would clean them and refill them. However, the flowers were all but gone and I think this gave the moths a window of opportunity. I think this was the cause of my losses.
I started the year with 7 hives. I made all successful splits and increased to 23 hives and 1 NUC - however, I lost a total of 6 hives in the past few months. Leaving me with 17 hives and 1 NUC. If God is willing and I don't loss any hives over the winter, I should be able to divide 17 into 68 or possibly as many as 136 (that would be 4 successful exponential splits).
 My actual goal is 100 hives by the end of next season. So for the rest of the winter, I will be in the wood shop building hives. I'll post on that as I progress.
However, for now my bees are in God's hands - I have done all I can do.
Hive Count: 17 Hives and 1 NUC
Thursday, September 20, 2018
Building A Better Beetle Trap

"Build a better mouse trap and the world will beat a path to your door." - Ralph Waldo Emerson
 Then I made cage around it with #8 hardware cloth and placed a cue-tip inside. I used a syringe to put apple cider vinegar on the cue-tips for beetle bait (BTW it got in my eye and it burned like hell).
I only had time to make 9 Sticky Traps, so I put them in the 9 weakest hives - that being said, all of my hives seem very strong.
It should rain for the next week, so I'll check on the traps after that.

Other Hive Notes:
It was a very hot day (95F) . To be honest, at 400lbs, I was a little worried about the heat but I made it a point to take it slow. Much to my delight, I never got overheated and I was able to check all 20 hives and place a Swiffer Sheet in each one.
A word on my bee jacket: I bought a Ventilated Bee Jacket from Bushy Mountain. I've had 4 other cotton jackets and suits and I got stung through them all! However, this jacket is like Kevlar for bees. I got a little rough with one of my hives and the bees went nuts... but not one of them stung me through my jacket.
I pulled 24 frames of honey from 4 different supers. I found that using a bee brush to remove the bees from each frame works really well. It's not much of a solution for large harvests but while I am just pulling 15 or 20 supers, it works great.
Also, by pulling one frame at a time, I was able to spot the brood and leave it behind - as well as the uncapped frames.
I'm now up to 35 gallons of honey. I plan to reinvest all of the money into building more hives.
I also finally got out to the Old Farm. That one hive is still alive. It was dry out there that day but it is usually very wet (ankle deep). So I think I'll just bring it to my house this winter and never go back to the Old Farm after that.
Final Hive Count: 20-Hives & 1-Five Frame Nuc
Monday, September 17, 2018
Bees, Beetles, and Mosquitoes... Oh My!

The super in the picture is about 13 years old and has been badly
treated. My latest act of malevolence was when I dropped the box about 8" filled with honey to knock out the last of the bees. Not only did this break the ears off of most of the frames but it made, the already weak corners, come apart.
 So I used 1/4 hardware cloth to repair it. The inside lip was also rotting away, so I used the wire to make a new ledge. If it works, great. I'll get another season or two out of the box. If not, nothing lost.
One day, and I hope soon, I will have enough return on my honey investment to buy good wood and plastic frames but until then... waste not, want not.
The 5 frame nuc I made has about 7 to 10 queen cells in it. I moved it out to Dr.D's Saturday. It seems fairly strong and I think it might just make it through the winter - if the beetles don't kill it first.
BEETLES! All of my hives are filled with beetles. Luckily the hives are strong and are keeping them beat down but the beetles are there and just waiting for their chance to destroy the hives.
Wednesday, I will place a swiffer sheet and a Fat Bee-man Trap (though I am not convinced they work) into each hive. I've also broken down and ordered beetle blaster traps for all 20 hives ($48 with S&H) and will put them in as soon as they arrive - they work great but are too pricey.

I think the apocalypse is near and the mosquitoes might be the fourth horseman. I've never seen mosquitoes this bad before. This pictures shows my pants leg but I was covered from head to toe. And it wasn't just out in the country - I must have killed 30 or more in my house that flew in as I came in the front door.
Maybe these incredibly hot days we are having this week will kill them back - I hope so anyway.
Harvest Continues: Well I've harvested 8 deep boxes and have gotten about 25 gallons now. I still have about 12 boxes to go.
Monday, September 10, 2018
We Harvest Honey When It's Warm For A Reason

The picture shows the stand I built for my honey extractor, so that I could fit the 5 gallon bucket under the bung hole.
I used a 4x4 that was actually only 3.5" tall. On top of that I used some scarp 1x4 material to make it a total of 4 1/4" tall. I attached all of this to a scarp piece of 3/4" plywood I had in the shop that was 28"x36".
I pre-drilled the bolt holes and used heavy 1/4" wood screws to secure the extractor to the stand. It worked very well and reduced the wobble of the extractor by about 75%.
Now that is all of the How-To part of my blog... what follows is my struggle to get the led out of my ass. Feel free to stop reading here.
 Maybe I'm just old... Maybe I'm just out of shape... Maybe I'm just lazy... I really don't know. However, Saturday I was so exhausted that I could hardly move. By Sunday, I felt fine and I was able to finish the work I started on Tuesday.
That's right Tuesday. As I said in the last blog, it was late Tuesday night before I got all of the supers in the house. So I had planned to extract them Wednesday. The trouble was, that I left the honey under the A/C all night and it became so thick, it wouldn't come out of the wax. So I placed a heater on it Wednesday.
Of course I work out of town on Thursdays and Fridays so those days were out.
Saturday I was so lethargic that I felt like I hadn't slept in days. I had stayed up the night before till midnight but I slept in till 9am - so that didn't seem like the problem. I also crashed my diet Friday by eating a family size bag of M&M's... DON'T JUDGE ME, YOU DON'T KNOW ME! Anyway, Saturday might have been a sugar crash. Whatever the reason, I didn't do anything productive that day either.
That brings us to Sunday. Now I had the heater going (which worked great). I also had the extractor spinning and with the new stand, it was spinning about 20 frames an hour. I also had the washer going in the adjacent room since I had gotten honey on my beekeeping jacket.
So as I was finishing up at 7:30pm, my wife came home from work and I kissed her. I'm so in love with her, that I saw a flash of light. I kissed her again, and again there was a spark. She felt it too... or at least saw it.
"Did you see that?" she exclaimed. "Was that the refrigerator?"
It was. The old wiring in my house couldn't take all the appliances... or maybe the little fan next to the sink had gotten wet while I was doing the dishes (I'm a big multi-task'er)... whatever the reason, the outlet blew.. Thankfully there was no fire - I checked on it all night and hardly slept but no fire. So the outlet will need to be replaced - add it to my list of things I need to fix.
Well, it took most of the afternoon but I got all 5 boxes of honey extracted and came out with about 12 gallons of honey - 16 gallons total so far this season. I say about, because the sieves hang down in the bucket so that I can only fill them to about 4.5 gallons full.
So that's my story... weather has me down until the weekend, so until then, best wishes faithful readers.
Tuesday, May 1, 2018
And the splits just keep on coming
"By prevailing over all obstacles and distractions, one may unfailingly arrive at his chosen goal or destination," Christopher Columbus ... Big talk for a man who thought he was in India.
If the following blog goes off the rails, forgive me. I woke up at 3:00am with my "Night Dreads." If you're not familiar with my "Night Dreads", it is the phenomenon where I wake up in the middle of the night and begin worrying about the most ridiculous things. Last nights night dread topic: How I would change my life if I somehow traveled through time and was 17 again. At 5:20am I concluded that I would have to go back to age 16 to make any real change but that I would have started building bee hives the moment I arrived in 1990! "There is a fine line between genius and insanity. I have erased that line." - Oscar Levant.
THE PLAN:
This past Wednesday I had planned to build 10 lids & 10 bottoms and Saturday I would make my 10 splits.
THE OBSTACLES:
When Wednesday came, I allowed myself to be lazy. If failure was a sickness, laziness would be the symptom. I instead told myself, I would build them Saturday and make my splits Sunday.
Well Thursday, on my way to work in Vicksburg, the water pump on my truck began leaking - like a sieve. There was a lot stress and drama involved in getting home but by 6:00pm Saturday, I made it back.
Sunday I bought the new seals for the water pump and while I waited for the truck to cool down, I made the lids and bottoms for the splits. I then spent the rest of the day taking the whole truck apart to put in the seals. Thanks to YouTube, the job went smoothly but it took all day.
So yesterday, Monday 4/30/18 at 5:00pm (after I got home from work) Noah and I went out to Dr. D's to make splits.

THE SPLITS:
We only had time to make 4 splits - A,B,C,D. We started with D and found 5 frames of swarm cells. So we removed them from the box and divided them amongst the other splits.
On split C we found that the box was full of honey but no brood, so we decided to put a frame of queen cells in both boxes. Figuring that it might be missing a queen or just need a better one. However, when we retrieved the the frame with a queen cell, the cell was open and empty. Noah checked the other frames we had set to the side and there she was - the virgin queen. So we grabbed her (gently) and popped her in the hive. So as you can see the splits were just in the nick of time.
I worry that there might be other hives on the verge of swarming but I just don't have time to do anything about it. If all goes well, then Saturday, I will build boxes and wax the old plastic frames. Then Sunday, I will continue with the rest of my splits.
For now, HIVE COUNT: 18 Hives.
If the following blog goes off the rails, forgive me. I woke up at 3:00am with my "Night Dreads." If you're not familiar with my "Night Dreads", it is the phenomenon where I wake up in the middle of the night and begin worrying about the most ridiculous things. Last nights night dread topic: How I would change my life if I somehow traveled through time and was 17 again. At 5:20am I concluded that I would have to go back to age 16 to make any real change but that I would have started building bee hives the moment I arrived in 1990! "There is a fine line between genius and insanity. I have erased that line." - Oscar Levant.
THE PLAN:
This past Wednesday I had planned to build 10 lids & 10 bottoms and Saturday I would make my 10 splits.
THE OBSTACLES:
When Wednesday came, I allowed myself to be lazy. If failure was a sickness, laziness would be the symptom. I instead told myself, I would build them Saturday and make my splits Sunday.
Well Thursday, on my way to work in Vicksburg, the water pump on my truck began leaking - like a sieve. There was a lot stress and drama involved in getting home but by 6:00pm Saturday, I made it back.
Sunday I bought the new seals for the water pump and while I waited for the truck to cool down, I made the lids and bottoms for the splits. I then spent the rest of the day taking the whole truck apart to put in the seals. Thanks to YouTube, the job went smoothly but it took all day.
So yesterday, Monday 4/30/18 at 5:00pm (after I got home from work) Noah and I went out to Dr. D's to make splits.

THE SPLITS:
We only had time to make 4 splits - A,B,C,D. We started with D and found 5 frames of swarm cells. So we removed them from the box and divided them amongst the other splits.
On split C we found that the box was full of honey but no brood, so we decided to put a frame of queen cells in both boxes. Figuring that it might be missing a queen or just need a better one. However, when we retrieved the the frame with a queen cell, the cell was open and empty. Noah checked the other frames we had set to the side and there she was - the virgin queen. So we grabbed her (gently) and popped her in the hive. So as you can see the splits were just in the nick of time.
I worry that there might be other hives on the verge of swarming but I just don't have time to do anything about it. If all goes well, then Saturday, I will build boxes and wax the old plastic frames. Then Sunday, I will continue with the rest of my splits.
For now, HIVE COUNT: 18 Hives.
Sunday, March 25, 2018
First Split of 2018 & Big Bryan's Beetle Box
"Necessity if the mother of invention." - Plato
I am an inventor at heart and given my beetle problems last year, I have been trying to build a better mousetrap (beetle trap). Beetle Busters are great but they can get expensive. Fat Bee Man's political sign traps seem reasonable but I still have beetles when I use them. Of course dryer sheets work really well but they seem to kill one bee for every two beetles.
So here is my latest invention. Big Bryan's Beetle Box.

 It is a simple and cheap beetle solution. It's a 3/8" thick #8 hardware cloth box with a dryer sheet inside. This way the beetles can get to the dyer sheet but the bees can't.
I put my first prototypes in the hives yesterday. There were not a lot beetles since all of my hives are so strong but there were still a few. I placed 7 traps in seven hives - 3 of them I poured Apple Cider Vinegar on. I'll let you know how they work next week.
"He also divided the two fish among them all." - Mark 6:41
I split (divided) the six hives at Dr. D's place into twelve. Of course this isn't the first time I made splits but this is the first time I did it with complete confidence.
If you've been following my blog, then you know that last year I made a lot of splits that ultimately failed. But in the words of Thomas Edison, "I haven't failed. I just found 10,000 ways that won't work."
So here is what we did yesterday.

First, we cleaned the apiary up and leveled our concrete blocks.
The next step was to decide on the location of each split. We did our best to put the split as far from the original location as possible - though this is really not that important since the nurse bees will stay with the move and all the workers will go back to the original location.
With the locations decided we began the process. We started with "F" and worked backwards to "A" since "A" had been our most cantankerous hive last year. "F" was also the only hive with only one super.
 I moved the whole hive to location "F1" and then placed an empty supper on the site of "F". I placed 2 frames of eggs, larva, and nurse bees on the "F" site. Then I added a frame of honey and pollen. The rest of the frames were empty waxed frames. I added some empty frames to the "F1" site and closed them up.
 Now I never found a single queen in any of the hives yesterday but I made sure to leave eggs in both hives just in case the queen ended up on the original location.
We repeated the steps for each hive. Since it was very cloudy, it took a long time to confirm eggs were in each frame. The whole process took us 3.5 hours.
Despite the clouds, the bees were fairly docile. Noah got stung 5 or 6 times and I got stung about 7 or more but that isn't really too bad considering the weather.
I will check the splits next Saturday and make sure there are queen cells in all of them.
Now I know you shouldn't count your bees before they hatch but I'm going to.
New Hive Count: 13 Hives
I am an inventor at heart and given my beetle problems last year, I have been trying to build a better mousetrap (beetle trap). Beetle Busters are great but they can get expensive. Fat Bee Man's political sign traps seem reasonable but I still have beetles when I use them. Of course dryer sheets work really well but they seem to kill one bee for every two beetles.
So here is my latest invention. Big Bryan's Beetle Box.
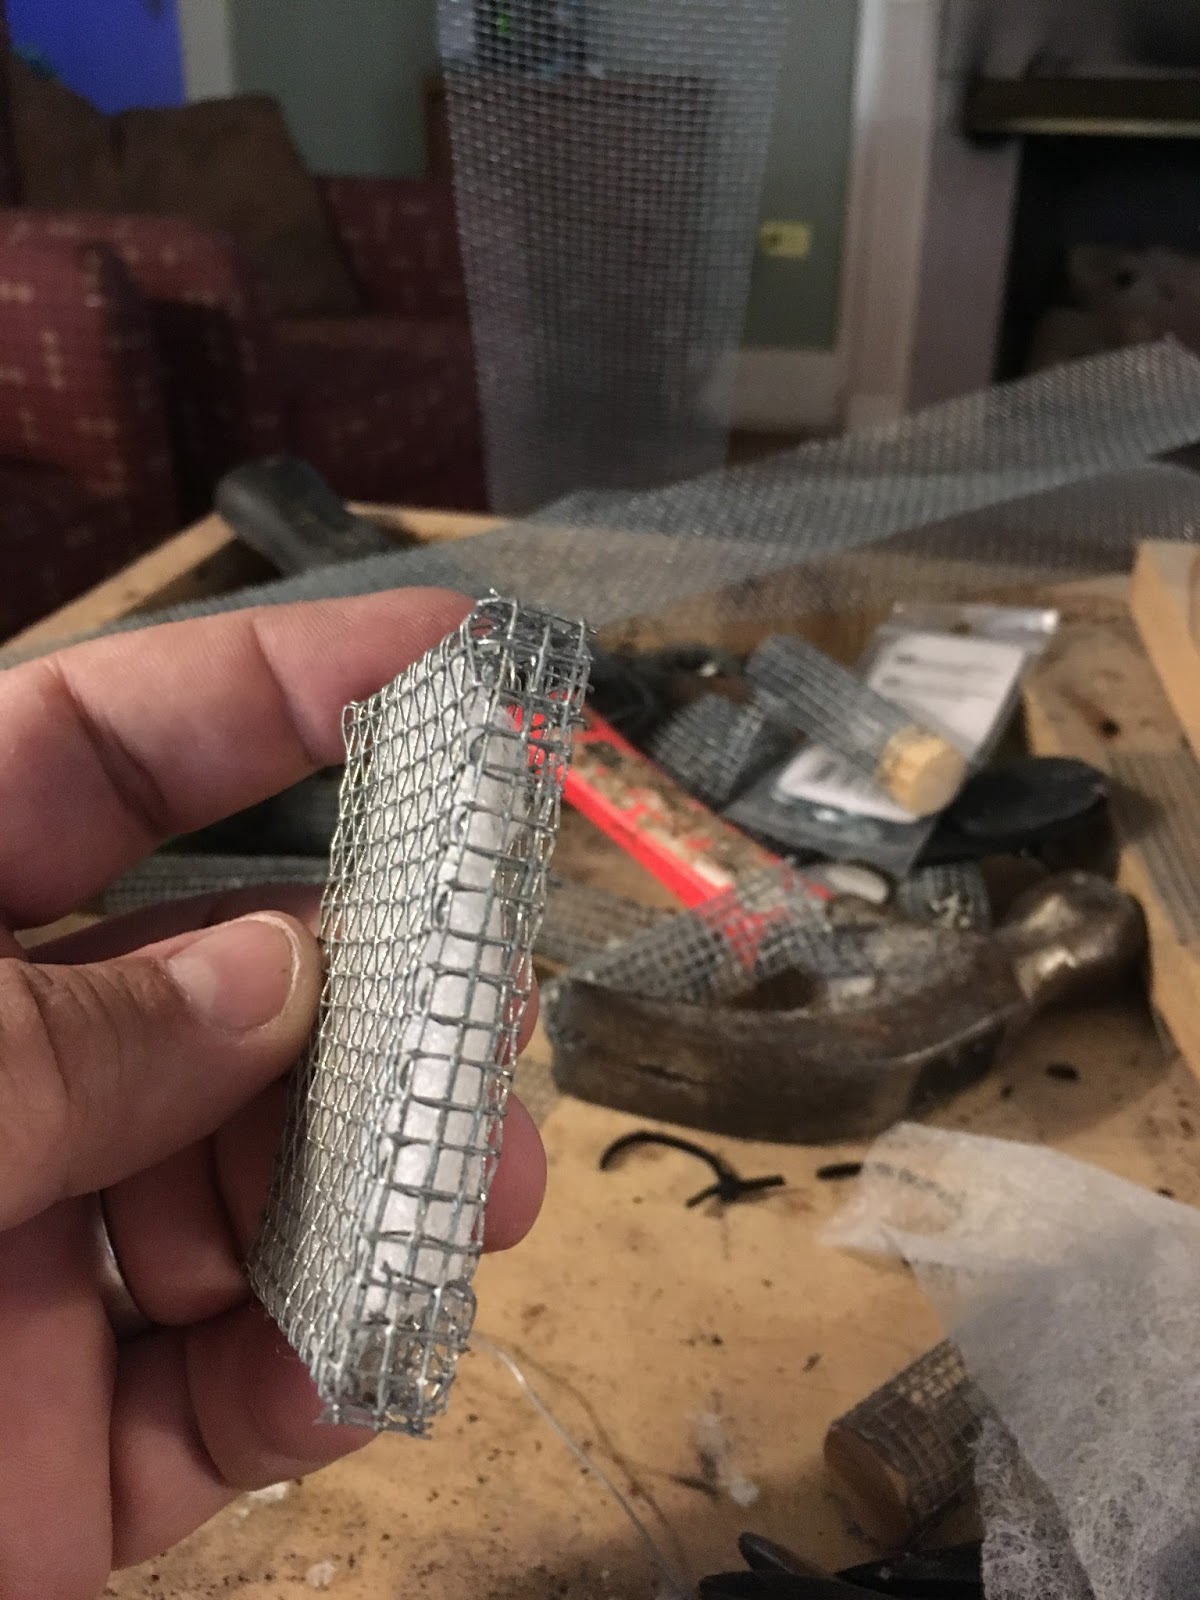
 It is a simple and cheap beetle solution. It's a 3/8" thick #8 hardware cloth box with a dryer sheet inside. This way the beetles can get to the dyer sheet but the bees can't.
I put my first prototypes in the hives yesterday. There were not a lot beetles since all of my hives are so strong but there were still a few. I placed 7 traps in seven hives - 3 of them I poured Apple Cider Vinegar on. I'll let you know how they work next week.
"He also divided the two fish among them all." - Mark 6:41
I split (divided) the six hives at Dr. D's place into twelve. Of course this isn't the first time I made splits but this is the first time I did it with complete confidence.
If you've been following my blog, then you know that last year I made a lot of splits that ultimately failed. But in the words of Thomas Edison, "I haven't failed. I just found 10,000 ways that won't work."
So here is what we did yesterday.

First, we cleaned the apiary up and leveled our concrete blocks.
The next step was to decide on the location of each split. We did our best to put the split as far from the original location as possible - though this is really not that important since the nurse bees will stay with the move and all the workers will go back to the original location.
With the locations decided we began the process. We started with "F" and worked backwards to "A" since "A" had been our most cantankerous hive last year. "F" was also the only hive with only one super.

 Now I never found a single queen in any of the hives yesterday but I made sure to leave eggs in both hives just in case the queen ended up on the original location.
We repeated the steps for each hive. Since it was very cloudy, it took a long time to confirm eggs were in each frame. The whole process took us 3.5 hours.
Despite the clouds, the bees were fairly docile. Noah got stung 5 or 6 times and I got stung about 7 or more but that isn't really too bad considering the weather.
I will check the splits next Saturday and make sure there are queen cells in all of them.
Now I know you shouldn't count your bees before they hatch but I'm going to.
New Hive Count: 13 Hives
Monday, February 26, 2018
2018 First Inspection of Spring

Is there anything more daunting than the first hive inspections of spring? This was the harshest winter since I started keeping bees. Yet, I am happy to report that I only lost one hive. It was the VSH Hive that was full of drones at the end of fall - of course it was expected. What was not expected was how much honey is in my hives.
The VSH hive still had several frames of honey but was being robbed by the other bees, so I took the 20 frames of wax and honey and divided them between the surviving hives.
On hives A, B, C.1, and B.1: I added a super with five frames of wax/honey and five unwaxed plastic frames. I didn't want to give them too much comb to defend against wax moths and beetles.

At home, I moved the fence surrounding my bee yard and, in doing so, doubled the area to about 30'x60'. I plan to move my chickens into this area as soon as it dries up a little - as well as some bees.
The Plan:
The plan is to make a lot of splits this year. The question is, when to start? The weather looks warm and favorable but there is still the Easter cold snap to consider. Nonetheless, as soon as I see drones, I will begin the splits.
I also plan to do hive removals this year to help increase my apiary size.
The Goal:
100 Hives by winter. It's a lofty goal but that's how many I need. The remaining 7-hives will most likely split into 28-hives. The rest will have to come from the bee removals. I, of course, realize the flaw of my goal - but "a man's reach should exceed his grasp, or what is heaven for?" -Robert Browning.
Given how much honey is in my hives after this long harsh winter, I am confident, that I only need one super per hive to survive next winter. I actually feel excited by the thought.
Hive Count: 7-Hives
Monday, November 6, 2017
Pear Mead: One Month Out
 "In wine there is truth," Pliny the Elder... and with a name like that, you have to believe him.
I spent the weekend doing chores around the house. Of my many tasks, Sunday I bottled the Pear Mead I made on 9/24/2017.
Mistake 1: While I was preparing to bottle, I kept thinking there are 3.7 litters in a gallon - which is true. So I set out three bottles and a couple of 8oz. mason jars for the .7 litters - most of you may already see the error here.
So I sanitized all my equipment, set my corks to soaking, and then began siphoning (quite successfully I might add) the mead into the bottles. When the three bottles were filled, I still had a 1/2 of gallon of mead left. Dote!
I of coursed panicked and, in doing so, stirred the sediment at that bottom - not totally but enough to cloud the remaining mead.
In the end I ended up with three crystal clear bottles of mead and two slightly cloudy 8.oz mason jars. I placed the mason jars in the fridge to chill for tasting later that night. The rest went down the drain.
 |
| This is as far as I can push it with my hand. |
Now I might have mentioned this before but I am a rather large fellow. So to cork the bottles, I placed the base of the bottle on an oven mitt for traction, then I used my bare (bear) hand to force the cork into the neck of the bottle. Then I placed the Corker on the remaining 1/4" (and after about 20 attempts) I made the cork flush with the top of the bottle.
WHAT A USELESS CONTRAPTION! Or so I thought.

This time, I had the same trouble but after I had already forced the corks into the neck of the bottle by hand, I couldn't get the corker to drive them home.
So I did what I should have done in the first place - I YouTube'd it.
Wow, talk about feeling like the guy who tried to make orange juice by concentrating. It was too late for the three bottles I was working on but now I can't wait to try the corker out. (It took a lot of restraint, not to cork an empty bottle.)
Tasting Note - One Month Out:
The Pear Mead tasted very dry at first with a faint sent of pear and a strong sent of yeast. However, after allowing it to air for 40 minutes, it tasted a little less dry but had an acidic finish. I am hoping that time will reduce the acidity.
This was a sweat recipe with an added cup of pears (see previous blog: Mead - Mastering the basics)
Wednesday, November 1, 2017
Predator-Proofing my Chicken Tractor

My first three months of chicken husbandry was a lot more work than it needed to be. Taking the chickens outside every day and carrying them back inside every night was a hassle and quite time consuming. Thankfully that is behind me.
It took nearly three months to get around to it but I finally finished my chicken tractor. The original chicken tractor was done months ago but I wanted mine to be more predator-proof. So last Wednesday, despite being run down from two weeks of long office hours, I got a second wind and four hours later, it was done.
The extra step was to attach out-rigging to the base of the pen to prevent predators from digging under the edges. I think this is a pretty good idea.
 |
| Chain link hinges |
The out-rigging was made out of four pressure treated 2x4x10' that I ripped down the center. My coup is 4x8, so the extra two foot of left over was used as the end pieces of the sides. The front and end is 6' tapering to 4' (truthfully, this happened because I meant to use 2x4x12' but it turned out to look great). The final diagonal bits were constructed out of scrap I had from the original coup build.
 |
| Upside-down showing the wheels engaged |
I also attached some wheels that I haven't used since the night I first put them on. The tractor is light enough that I really don't need them.
So that's my predator-proof chicken tractor. Leave a comment and let me know what you think.
Sunday, September 24, 2017
Mead - Mastering the basics

Bees make honey but men make mead - the latter being the more remarkable. Mead is extraordinarily simple to make and fairly idiot proof as I myself have proven.
I have taken to making my mead from the cooked honey that I get when I melt my wax. This past weekend I racked my second attempt and then made a third batch. I tasted the mead as I siphoned it and it tasted pretty good - at least it didn't taste off. It was a bit dry but I had used a dry recipe. The simple recipe I am using is from stormthecastle.com and is as follows:
Dry Mead
- 12 lbs. of Honey
- 4 gallons of spring water
- 5 teaspoons of yeast nutrient
- 5 teaspoons of yeast energizer
- 2 packets of Lalvin 71b-1122 yeast (or a suitable replacement)
Medium Mead
- 15 lbs of Honey
- 4 gallons of spring water
- 5 teaspoons of yeast nutrient
- 5 teaspoons of yeast energizer
- 2 packets of Lalvin 71b-1122 yeast (or suitable replacement)
Sweet Mead
- 18 lbs of Honey
- 4 gallons of spring water
- 2 teaspoons of yeast nutrient
- 2 teaspoons of yeast energizer
- 2 packets of Lalvin 71b-1122 yeast (or suitable replacement)
However, I don't make five gallon batches as that is just too much honey to waste on an experiment. Instead, I make one gallon batches and alter the recipe by parts. Like this:
Sweet Mead
- 1.5 part Honey (1 quart)
- 4 parts spring water (2.75 quarts)
- 1 teaspoons of yeast nutrient
- 1 teaspoons of yeast energizer
- 1 packets of Lalvin 71b-1122 yeast
I keep my mead in a warm area for the fermentation and cover it with a towel to keep it in the dark. After wracking it, I move it to an area near the A/C and store it at about 68͒. I know I should keep it at around 58͒ but I don't have that kind of setup yet.
Now my first batch is nearly two years old. We tasted it last Christmas and it was very strong and dry. The second batch is a little sweeter but still dry. When I racked it, I added a half of cup of honey to one of the bottles to back sweeten it. That may have been too much. To make sure it didn't begin fermentation again, I placed a rubber glove on the bottle over night. After 24 hours (and no sign of gas build up) I put a cap on it.
I created a third batch this past weekend and used the "Sweet" recipe but I also added a cup of pears.
When my wife and I were in Ireland we tried Bunratty Mead at the Bunratty Castle. That mead was infused with pears and was amazing. It wasn't too sweet and the pear flavor added a soft layer of fruitiness. I can only hope my mead comes out even half as good. Only time will tell.
Wednesday, August 9, 2017
Walkaway Splits - Right & Wrong
"If a job is worth doing, it's worth doing poorly first." - Joel Salatin
Work and weather have stifled my beekeeping but it hasn't stopped me completely. Saturday, my wife and I went out to Dr. D's place and split Hive-B.1 & Hive-C. This gives me (10) Hives and (3) Five-Frame-Nucs.
However, while making my splits, I wasn't thinking and therefor I made two different kinds of Walkaway Splits.
Hive-B.1 was split by taking the top box off and placing it on the new location. Then I made sure that box was filled with eggs, pollen, and honey. Of course a lot of the bees will return to the original location, so I shook (10) frames of bees into the new box in hopes that at least half of the bees might stay. This will probably do fine but it is not the best practice (in my humble opinion anyway).
Hive-C was split perfectly. I moved the whole hive to the new location and then placed a box filled with eggs, pollen, honey, and two frames of nurse bees on the old location. All of the field bees will return to the original location and that will ensure there are enough bees to fight the dreaded Small Hive Beetles. That is, in my opinion, the best practice for making a walkaway split.
All four of the hives were given eggs, pollen, and honey so that no matter where the queens ended up, the other half of each split would have everything needed to produce new queen cells.
Also, if you notice in the graph above, I did not use the VSH eggs in these splits. Hive-C is my oldest and most resilient hive, so I wanted to keep that genetic stock in my yard.
Hive-B was a swarm that just took up residence in an empty box in my apiary but that queen has proven over the past couple of years to be resilient and gentle - again, good genetic stock.
The VSH queen is the mother of all of the hives at my house and will be the root stock of most of my grafts but it is important to keep diversity in breeding and so that is why I chose to make my recent splits without VSH eggs.
The last thing I did was to shake 5 frames of bees into a Starter Hive (Hive-VF). The Five-Frame-Nuc has a screened bottom and no exit. I also placed a hive top feeder on it and then made brackets so the lid could be secured in place. At the end of the season I will give this box a queen and enough resources to survive the winter.
So with this addition and the (3) hives at my house, I am now equipped to graft at will -- well as soon as the rain stops.
 |
| All of my hives at Dr.D's are spaced 18" apart in all directions |
Work and weather have stifled my beekeeping but it hasn't stopped me completely. Saturday, my wife and I went out to Dr. D's place and split Hive-B.1 & Hive-C. This gives me (10) Hives and (3) Five-Frame-Nucs.
However, while making my splits, I wasn't thinking and therefor I made two different kinds of Walkaway Splits.
Hive-B.1 was split by taking the top box off and placing it on the new location. Then I made sure that box was filled with eggs, pollen, and honey. Of course a lot of the bees will return to the original location, so I shook (10) frames of bees into the new box in hopes that at least half of the bees might stay. This will probably do fine but it is not the best practice (in my humble opinion anyway).
Hive-C was split perfectly. I moved the whole hive to the new location and then placed a box filled with eggs, pollen, honey, and two frames of nurse bees on the old location. All of the field bees will return to the original location and that will ensure there are enough bees to fight the dreaded Small Hive Beetles. That is, in my opinion, the best practice for making a walkaway split.
All four of the hives were given eggs, pollen, and honey so that no matter where the queens ended up, the other half of each split would have everything needed to produce new queen cells.
Also, if you notice in the graph above, I did not use the VSH eggs in these splits. Hive-C is my oldest and most resilient hive, so I wanted to keep that genetic stock in my yard.
Hive-B was a swarm that just took up residence in an empty box in my apiary but that queen has proven over the past couple of years to be resilient and gentle - again, good genetic stock.
The VSH queen is the mother of all of the hives at my house and will be the root stock of most of my grafts but it is important to keep diversity in breeding and so that is why I chose to make my recent splits without VSH eggs.
The last thing I did was to shake 5 frames of bees into a Starter Hive (Hive-VF). The Five-Frame-Nuc has a screened bottom and no exit. I also placed a hive top feeder on it and then made brackets so the lid could be secured in place. At the end of the season I will give this box a queen and enough resources to survive the winter.
So with this addition and the (3) hives at my house, I am now equipped to graft at will -- well as soon as the rain stops.
Thursday, July 6, 2017
More Queens Than A Cher Lookalike Contest - Graft #2
I've been quoting that line since 1997 (holy shit - I just realized how old that movie is... even worse... how old I am) - actually I've been misquoting it, as the case may be, since I always say, "It can't rain everyday." Either way, I've had two sunny days in a row now and I hope the trend continues.

We didn't check Hive-A. Until we requeen it, I could do without the aggression - so we moved on.
 It turned out that our walkaway split of Hive-B was textbook. The queen actually ended up in the split (Hive-B.1) and is doing really well. So we knew Hive-B would have the queen cells and boy did it. There were at least (12) to (15) cells. There was a lot of bees in both hives and they were all very docile.
Hive-VSH is doing well.
Hive-D.3 is still infested with beetles and there is still about a hundred bees waiting inside for death.
Hive-C looked much stronger. I still need to split it and replace the rotted boxes but it seems to be doing fine.
The last thing we did was to take (2) frames of eggs from Hive-VSH, without taking any bees, and put them in a Five Frame Nuc (i.e. VE). We then shook (4) frames of bees from Hive-B into the nuc. If that doesn't survive the beetles then it is hopeless.
To finish our visit we placed Don the Fat Bee Man beetle traps in all of the hives.
We took VE home and did the following:
One frame of eggs was placed in Hive-A.1.VSH to let them raise their own queen.
The other frame was taken to my shop table where I made my grafts. The queen cups had been in VD (giggle giggle) overnight for polishing and were made from new (chemical free) wax. I also kept a moist towel over the larva while I grafted them.
 It again took me (30) minutes to complete my grafts. I would have liked to have gone faster but I'm still learning and it is very delicate work - especially for a guy with Bananas Hands (That's my wife's nickname for me).
When I completed my grafts, I took the remaining frame of eggs and, using the Miller Method, cut it in a zigzag pattern.
The miller frame was placed in VE and the grafts were placed in VD (giggle giggle).
On a separate note: I found about (5) hive beetles in VD (giggle giggle) and a few beetle larva. All of them were on the bottom board and it appeared the beetle larva was eating the Crisco in the FBM traps. I squished all of the beetles but left the larva in the Crisco to see if that kills them.
At the end of the day, the Hive Count is: (8) Hives and (2) Nucs.
Thursday, June 29, 2017
A Good Day to Make Splits
"Five hundred. … five hundred fights, that’s the number I figured when I was a kid. Five hundred street fights and you could consider yourself a legitimate tough guy. You need them for experience. To develop leather skin. So I got started. Of course along the way you stop thinking about being tough and all that. It stops being the point. You get past the silliness of it all. But then, after, you realize that’s what you are." Vin Diesel, in Knockaround Guys
After a long (very hot) afternoon of beekeeping, I came home and jumped in the shower - that's when I saw them. Four stings on my forearm. I knew I had gotten a couple of stings; one on my back and one under my arm but that was it. That's when I realized I had come to a turning point. I quit counting stings about a month or so ago (right after the day I got those (60) at one time). It stopped being the point... and I got past the silliness of it all.
This may be as much to do with the calmer hives I have begun to breed. At present I only seem to have one cantankerous hive left at Dr. D's place. Hive-A is still fairly aggressive but Hive-A.1.VSH has become as calm as a Hindu cow.
All and all it was a great day of beekeeping. Here is what we did:
Hive D.3.VSH has succumb to the hive beetles. In fact it has also begun to have Wax Months. There was still about a cup of bees in the hive but the beetles had destroyed all the wax. For now we just left it but I will retrieve it this weekend.
Hive A.1.VSH was dealt with next. We opened the top and found it full of bees. No further inspection was needed. We stapled #8 HW Cloth over any openings and ratchet strapped the whole thing tight. We then loaded it up and took it to the house.
Hive B was then split. I did this in the walkaway split style. First I moved the top two boxes of honey to the new location. I then placed the brood chamber on top. From there I split the brood chamber in half, making sure to put eggs and stores in both. I then used the frozen frames (after they thawed) to fill in the open spaces. I then placed the single box with about two frames of nurse bees back on the original location.
When complete, I had a new hive... Hive B.1 I didn't put a VSH egg in this one because it was already calm and I want to keep some genetic diversity in the apiary.
VC was last. VA and VB are the two five frame nucs that the beetles destroyed. I've decided for now just to keep the letters running in order. VC was filled with two frames of brood, eggs, & bees from Hive A and one frame of just eggs from Hive VSH. We then took it home with us. At home, I took the mini mating nuc full of bees and added them to VC. I also took the VSH frame of eggs and placed them in Hive D.VSH.
I would have like to have done more but the heat was pretty bad and my suit was stifling. Saturday I plan to do more. Nonetheless, it was a great day of beekeeping and I felt confident in all of my hive manipulations. It is late in the season but I think I still have time to make some gains.
Hive Count: (9) Hives and (1) Five Frame Nuc
After a long (very hot) afternoon of beekeeping, I came home and jumped in the shower - that's when I saw them. Four stings on my forearm. I knew I had gotten a couple of stings; one on my back and one under my arm but that was it. That's when I realized I had come to a turning point. I quit counting stings about a month or so ago (right after the day I got those (60) at one time). It stopped being the point... and I got past the silliness of it all.
This may be as much to do with the calmer hives I have begun to breed. At present I only seem to have one cantankerous hive left at Dr. D's place. Hive-A is still fairly aggressive but Hive-A.1.VSH has become as calm as a Hindu cow.
All and all it was a great day of beekeeping. Here is what we did:

Hive A.1.VSH was dealt with next. We opened the top and found it full of bees. No further inspection was needed. We stapled #8 HW Cloth over any openings and ratchet strapped the whole thing tight. We then loaded it up and took it to the house.
Hive B was then split. I did this in the walkaway split style. First I moved the top two boxes of honey to the new location. I then placed the brood chamber on top. From there I split the brood chamber in half, making sure to put eggs and stores in both. I then used the frozen frames (after they thawed) to fill in the open spaces. I then placed the single box with about two frames of nurse bees back on the original location.
When complete, I had a new hive... Hive B.1 I didn't put a VSH egg in this one because it was already calm and I want to keep some genetic diversity in the apiary.
VC was last. VA and VB are the two five frame nucs that the beetles destroyed. I've decided for now just to keep the letters running in order. VC was filled with two frames of brood, eggs, & bees from Hive A and one frame of just eggs from Hive VSH. We then took it home with us. At home, I took the mini mating nuc full of bees and added them to VC. I also took the VSH frame of eggs and placed them in Hive D.VSH.
I would have like to have done more but the heat was pretty bad and my suit was stifling. Saturday I plan to do more. Nonetheless, it was a great day of beekeeping and I felt confident in all of my hive manipulations. It is late in the season but I think I still have time to make some gains.
Hive Count: (9) Hives and (1) Five Frame Nuc
Monday, March 27, 2017
First Inspection 2017 - Trying not to screw the pooch!
 |
| Hives (A) & (B) |
On Friday, March 24th I took my nephew Zack with
me for the first hive work of the year. I went to my (4) hives at the doctor’s
place and I couldn’t have been more pleased. The hives are strong and healthy.
Since I didn’t gather much honey last year, the super count on the (4) hives
goes like this: Hive A had (2) supers, B had (2), C (3), and D (4).
I “checker boarded” A, B, and D with new foundationless
frames adding a super to each. On Hive C, I added last year’s empty plastic
honey frames. I also added FBM type Hive Top Feeders with 1:1 sugar syrup
treated with FBM Brood builder essential oils. 2 quarts was given to each hive.
On that note:
Don the Fat Bee Man has carved out a wonderful niche for
himself as a teacher. I love teaching and I think Don is a very smart
beekeepers, so good for him. That being said, his YouTube videos are filled
with errors. I can’t figure out if they are intentional or accidental. I left
comments for clarification but he doesn’t respond – so I suspect they are
intentional.
Two things I’ve been very interested in are Brood Building
and Mini Mating Nuc’s. This is where I found the most frustrating of errors.
His nuc dimensions don’t add up and in his recipe for Brood Builder, he uses
one oil while saying the name of a different one. I guess he wants you to join
his class to get the accurate info.
I would love to join such a class but to be honest; MOST of
the beekeepers on YouTube have such huge egos! I’ve been half-ass beekeeping
for about a decade now and while I have learned a lot, there is still so much
left to learn. I would love to get in with a group like Ditchdoc 129 on YouTube
– they are learning together without egos and doing a great job.
Still there is a certain pride in being self/book/video
educated. I’ve spent all winter watching YouTube videos and on Friday’s visit
to the apiary, I felt a 100 times more confident about what I was looking at.
It was as if I had watched over the shoulder of countless beekeepers for 10 years’
worth of inspections.
Anyway, I digress. So here is the brood builder recipe (I
got this from Don’s videos but clarified it with several other YouTubers):
- 1 teaspoon Tea Tree Oil
- 1 teaspoon Wintergreen Oil
- 1 teaspoon Spearmint Oil
- 5-10 drops of Lemongrass Oil
- Mix it with 1 quart of water. Then add ¼ cup of mix to 1 gallon of 1:1 sugar syrup.
Now I should point out that I’m an idiot! I didn’t look for
the queen in any of my boxes. I just wasn’t thinking and in doing so I may have
endangered Queen “A”. There was brood in the upper box so she might have
been on the frames I checker-boarded. I pray I haven’t killed her.
Of the four hives, “A” is my most gentle. It is also the one
that has the beard on it and I fear it may be about to swarm. I don’t think it
had a beard before I began working on it Friday but it has one now – another reason
I worry I may have done something to the queen. I went back out on Sunday and
it is still there. I sat arguing with myself over what the beard meant and
whether or not to split.
Everyone keeps telling me not to split them until after the
Easter Cold Snap but on Tuesday, I plan to do it anyway. I also plan to bring
the “A” queen and half of the hive to my house to be my breeder queen and use
her for grafting.
 |
| Drier Sheet after winter - Hive beetles are now under control. |
Last Note: I got stung 9 times when I attempted to inspect
Hive C without smoke – or suit. I had actually only meant to go out on Sunday
and inspect the hive top feeders but I accidently bumped it… or maybe I thought
I might take a quick look… truth is that once the attack began, I got very
fuzzy on the details!
However, I refused to kowtow to those little bitches and so
I went and got my smoker and made them behave. When I had checked all the
feeders and put cinnamon powder around the hives, I sat down amongst them –
meditating and worrying about what to do next.
With the start of bee season, I am sick with worry. This is
the year it could all work out – as long as I don’t screw the pooch!
Sunday, March 19, 2017
Mini Mating Nuc - Blueprint
 Mini Mating Nucs may be the most wonderful part of modern beekeeping. I say this, because so much of modern beekeeping has become completely standardized - yet there doesn't seem to be any standardization of the mini mating nucs. This gives the beekeeper a chance to experiment and discover without reinventing any wheels.
As I plan to breed queens this year, I looked online for a set of mini nuc blueprints but I didn't find much.
The Beekeeper's Workshop (TBW) had very nice plans for a four chambered mini nuc. You can find these plans on their website and on YouTube. I do plan to give these a try sometime but for now I wanted single nucs.
Don the Fat Bee Man has a great design as well (see his YouTube Channel) but in his video, the dimensions don't add up - and the plans are for a medium deep nuc (which might save a lot of wood).
Mann Lake sells a Styrofoam mating nuc but they cost $20 and are very small.
What I like best about the TBW four chamber nuc was that it could be stacked on top of a standard hive super. What I like best about Don's mini nuc was that it is made from scrap wood. I also like Don's better than TBW because it uses a half size 9 1/2" frame rather than 9 1/4" - this allows you to place two end-to-end in a full-size hive to draw out the wax. (You can do the same with the 9 1/4" but it makes a bigger gap.)
In my first attempt I divided the length of a full supper by half, I used 1x4 material, and used TBW 9 1/4" frame but this made the inside dimension of the nuc too short and didn't leave room for bee-space.
On my second attempt, I used the same outside dimensions but I used 1/2" lumber on the two ends (still used 1X4 material on the sides) and then I was able to use Don's 9 1/2" frames with just the right amount of bee-space.
I'm building these out of scrap wood. I use (3) - 1X4 on both sides (These are of course 3/4"X3 1/2") and I use (4) - 2 1/2"x1/2" boards on the front and (4) on the back (I ripped these boards from some 2 1/2"x3" stock I had). The staggered pattern locks all the boards together and makes a pretty solid box. I also use nail and glue on all my joints.
Now some beekeepers will freak out because all these little boards leave gaps and cracks. Relax! I found that if you brush each crack with a thin layer of glue and then just rub sawdust over them and into them, it all seals up tighter than Dick's Hat Band - I didn't invent this process but I like it!
So here is my blueprint - I drew it with Microsoft Excel and then imported it to Paintbrush so you will have to play with your print scale if you want it to be to scale. Otherwise, here you go:

If you have any problem viewing these plans, leave a comment and I'll email you a better copy.
Sunday, March 12, 2017
Queen Cell Cages
 There is an old episode of Frasier where Daphne gets the tune, "Flesh is burning... dana-na-na-nah... Flesh is burning... dana-na-na-nah..." the thought came to mind as I bobbled my soldering iron and could smell my skin burn before I even felt the pain - smelled like burning hair!
 Nonetheless, if you are going to raise queen bees, you will need Queen Cell Protectors. These can be bought but you will need a lot and, if you are like me, I have far more time than money. So I am making mine.
There are two really good YouTube videos on this:
One is by Ralph Jones III - who I enjoy just listening to for the accent! He has a lot of other great videos too.
The second is The Beekeeper's Workshop. The Beekeeper's Workshop has lot's of great videos and a lot of blueprints on their main site as well. I've watched all of their videos and I get a kick out of how much they sound like Sheldon Cooper's Fun With Flags videos.
I have found a couple of things that work easier for me.
For starters, you should use lead-free solder. Ralph said he had a problem with this but TBW's video advised using flux and that seemed to make it work great for me.
Ralf also suggested getting a plug cutter to make the wooden ends. However, 3/4" plug cutters are really hard to find and they only cut 1/2" deep. Now I have to shave down a 1x4 to 1/2" to get the plugs. A wooden dowel may have been easier.
 The other thing is that TBW twisted little "U" shaped wires to hold the cages closed before soldering. I found that if I wrapped the wire around my dowel and then rapped a single wire around the whole thing like a bread tie, then I could solder it on the dowel and then reuse the wire over and over. Those "U" shaped wires didn't work well with my big banana hands.
Oh and on the subject of wire. Every video I watch says "Just use #8 Hardware Cloth" as if you can find it at any feed store - YOU CAN'T. I went to every store in a 90 mile radius of the Delta and no one sold it. I eventually bought it from Amazon.com (Wal-Mart also had it Online).
The last thing I learned was to build a stand for your soldering iron so you don't have to hold it. This gives you two hands free and prevents burns - a problem I solved a day too late.
I can make about 5 of these an hour while I watch TV. That gives me 10 a night. I figure I will need about 600 for next year and so I should have no problem getting that many done.

So here is what you do:
Step 1 - Cut a 3"x3" piece of #8 Hardware Cloth. (that is 24 squares by 24 squares).
Step 2 - Roll the hardware cloth around a 3/4" Dowel. I made two 5" dowels and rounded off one end of each with sandpaper.
Sep 3 - Wrap a wire bread tie around the wire to hold it in place.
Step 4 - Dab flux on the two spots you want to solder and then solder the cage together. Make sure to let solder get down to the second layer.
Step 5 - At one end snip the wire 4 squares up every 2 or 3 squares. Then fold them in onto the end of the dowel. I use my second dowel to mash the ends tightly closed.
Step 6 - Add flux and solder the end to keep it from opening back up.
Pretty Simple. So give it a try and let me know how it works out for you.
Pretty Simple. So give it a try and let me know how it works out for you.
Friday, July 10, 2015
Failure to Thrive

Failure to Thrive is a medical term to describe children who are not gaining weight as expected and have poor height growth. However, today is seems like a good description of my beehives.
Today I visited my hives at Dr. D's place - I have been avoiding my 3 hives at the old farm since two of them are filled with hateful bees.
Of the hives at Dr. D's place, only 6 are still alive after all of my splits earlier this year. Below is a picture of that bee yard taken 5 weeks ago but shows the location of all my hives at Dr. D's:
 The hives marked with an X are the ones that are now completely empty. The rest are as follows:
Hive A: This is the first split I made this year. I have 3 supers on this hive now - each has 3 frames of bees in them and is doing well. I am feeding them sugar water and they had eaten about 40% of it in the past 20 days.

Hive C: This is the hive that had the moth infestation. As of today, there are only three frames of bees in it. This has not changed in the past 3 weeks (since I first found the moths). I did find some Wax Moth Larva in the sugar water and I tried to remove them all.
Hive D: This is one of my original hives. The bees in this hive are slightly aggressive but not nearly as bad as the ones in The Beast back at the old farm. As of now, I have 4 supers on this hive: 2 are filled with brood and one of them is filled with honey already.

Hive F: This new Italian hive has a lot of wax but no brood. The new Italian queen seems to be gone. I removed one frame of brood from Hive G that had a queen cell on it and placed it in Hive F. These bees had eaten half of the sugar water in their feeder trough.
Hive G: This new Italian hive only had 2 frames of brood and one of them had the queen cell on it. I am confused by this since it is a new queen and there is brood - so why was there a queen cell? These bees too had eaten half of the sugar water in their feeder trough.
Hive K: This new Italian hive had 3.5 frames of brood and bees with two additional frames of dark brown wax. They too had eaten half of their sugar water.
As you can see Hive C, F, G, and K simply are failing to thrive. Monday I will add brood from Hive D to Hives C, F, and K. I will also move young brood from Hive K to Hive G.
The local crop for these hives is Soybean. Soybean produces nectar and pollen from July 1 - August 31 in this area. So I am hoping that my hives will be able to take advantage of this and increase in size.
BTW: Today it was 91 degrees without a breeze - the heat index was 100 degrees. I sweated so much that I could see my tattoos through my drenched white shirt.
Subscribe to:
Posts (Atom)