Friday, November 17, 2017

Drones at the edge of winter

Link to YouTube Here
"Never trust a woman, even though she has given you ten sons," Chinese Proverb

That's a fitting quote given that my hive is full of sons (drones). This is a heartbreaking event so late in the year.

While doing a little winter preparation, I opened up the first hive (Hive-VSH) and found that it was full of drones. I felt sick. It was also full of beetles. Though neither issue seemed to be effecting the health of the hive - for now.

I quickly checked the other hives in the yard and they all seemed fine.

Hive-B.1.1, despite having issues earlier, has managed to make a come back but is still a little on the weak side with only about 8 frames of honey.

Without removing any frames I looked for signs of brood but didn't see any. I suppose the queens have quit l
aying for the winter. It was a bad idea anyway but I thought I might stick an egg in Hive-VSH in hopes that they might make a queen before the frost set in.

However, after watching the YouTube video (the picture above is linked) I've decided to merge VSH and B.1.1 together. I was already leaning in that direction but the video pushed me over the edge. So if this causes both hives to die, then I'll blame that YouTuber.

The weather will be warm and dry again of the Friday after Thanksgiving and so I plan to make that my final visit for the year.

I have taken the next 9 days off from work for Thanksgiving. I plan to use the time to get my wood shop cleaned up (it got pretty disorganized throughout the bee season) and to start building hives for next year.

I also plan to build a new beetle trap and try it out over the winter. I've made a little sketch here.

Next Blog will be on how I merged the two hives. Until then, Happy Thanksgiving.


Monday, November 6, 2017

Pear Mead: One Month Out

"In wine there is truth," Pliny the Elder... and with a name like that, you have to believe him.

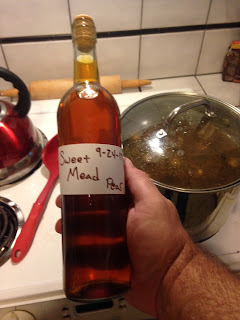
I spent the weekend doing chores around the house. Of my many tasks, Sunday I bottled the Pear Mead I made on 9/24/2017.

Mistake 1: While I was preparing to bottle, I kept thinking there are 3.7 litters in a gallon - which is true. So I set out three bottles and a couple of 8oz. mason jars for the .7 litters - most of you may already see the error here.

So I sanitized all my equipment, set my corks to soaking, and then began siphoning (quite successfully I might add) the mead into the bottles. When the three bottles were filled, I still had a 1/2 of gallon of mead left. Dote!

I of coursed panicked and, in doing so, stirred the sediment at that bottom - not totally but enough to cloud the remaining mead.

In the end I ended up with three crystal clear bottles of mead and two slightly cloudy 8.oz mason jars. I placed the mason jars in the fridge to chill for tasting later that night. The rest went down the drain.

This is as far as I can push
it with my hand.
Mistake 2: I needed to cork the three bottles. I have an Italian Double Lever Corker (that did not come with instructions.) The last time I used it, I only corked two bottles and the corker was next to useless.

Now I might have mentioned this before but I am a rather large fellow. So to cork the bottles, I placed the base of the bottle on an oven mitt for traction, then I used my bare (bear) hand to force the cork into the neck of the bottle. Then I placed the Corker on the remaining 1/4" (and after about 20 attempts) I made the cork flush with the top of the bottle.

WHAT A USELESS CONTRAPTION! Or so I thought.

This time, I had the same trouble but after I had already forced the corks into the neck of the bottle by hand, I couldn't get the corker to drive them home.

So I did what I should have done in the first place - I YouTube'd it.

Wow, talk about feeling like the guy who tried to make orange juice by concentrating. It was too late for the three bottles I was working on but now I can't wait to try the corker out. (It took a lot of restraint, not to cork an empty bottle.)

Tasting Note - One Month Out:

The Pear Mead tasted very dry at first with a faint sent of pear and a strong sent of yeast. However, after allowing it to air for 40 minutes, it tasted a little less dry but had an acidic finish. I am hoping that time will reduce the acidity.

This was a sweat recipe with an added cup of pears (see previous blog: Mead - Mastering the basics)

Wednesday, November 1, 2017

Predator-Proofing my Chicken Tractor

"Regard it as just as desirable to build a chicken house as to build a cathedral," Frank Lloyd Wright

My first three months of chicken husbandry was a lot more work than it needed to be. Taking the chickens outside every day and carrying them back inside every night was a hassle and quite time consuming. Thankfully that is behind me.

It took nearly three months to get around to it but I finally finished my chicken tractor. The original chicken tractor was done months ago but I wanted mine to be more predator-proof. So last Wednesday, despite being run down from two weeks of long office hours, I got a second wind and four hours later, it was done.

The extra step was to attach out-rigging to the base of the pen to prevent predators from digging under the edges. I think this is a pretty good idea.

I expected that lifting the out-rigging during moves would be an issue and had planned for an elaborate pulley system. Luckily the out-rigging doesn't cause any issues at all. I attached the pull rope to the front rigging so it lifts automatically. The two sides stay in the out position as the back edge never looses contact with the ground. And the tail end (that is identical to the front) just slides along as I pull. It works GREAT!

Chain link hinges
One problem I did have was that hinges are expensive. Not so much individually but I needed eight of them and that began to add up quickly. So (and I think this is one of my best ideas ever) I used links of chain instead. I simply took an old chain and cut sections of three links per hinge. Then I screwed them in place with washers (which I just happen to have exactly the right amount of in my scrap bucket - not that they cost much).

The out-rigging was made out of four pressure treated 2x4x10' that I ripped down the center. My coup is 4x8, so the extra two foot of left over was used as the end pieces of the sides. The front and end is 6' tapering to 4' (truthfully, this happened because I meant to use 2x4x12' but it turned out to look great). The final diagonal bits were constructed out of scrap I had from the original coup build.

Upside-down
showing the wheels engaged
Time will tell if my chicken tractor is truly predator-proof. However, I think this is great solution that only added $30 more to my overall cost. The best part is that now it only takes me about two minutes to feed, water, and move my chickens each afternoon.

I also attached some wheels that I haven't used since the night I first put them on. The tractor is light enough that I really don't need them.

So that's my predator-proof chicken tractor. Leave a comment and let me know what you think.