
Showing posts with label beetles. Show all posts
Showing posts with label beetles. Show all posts
Monday, April 1, 2019
Monday, November 19, 2018
Moth Prevention & Winter Preparations

I also placed a Fat Bee Man corrugated sign trap in each hive, as well as a swiffer sheet and beetle buster trap on the top bars. That's every trick in my bag.
After having the temperature dip into the 20's I thought I might have waited too late to winterize my hives. Luckily, I was blessed by God with a nice warm 67 degree day. Noah was working so I asked my 13-year-old nephew, Zane to help me out. He was a huge help and I wouldn't have gotten done without him.
 We staged all of the feeders and traps on top of each hive to minimize the amount of time each hive would be left open.
We then cleaned up the apiary and removed all the unused equipment - a full truckload (which might be part of my pest problem).
Lastly, we began placing the feeders. The first hive I opened was dead and filled with wax moths. I felt sick. The second hive looked good but then the third hive was dead. I could have thrown up!
With no other choice, I carried on. In the end, I lost three hives.
"Expect the best. Prepare for the worst. Capitalize on what comes." Zig Ziglar

Last month, when I extracted honey, I placed the empty supers back onto the hives in hopes that the bees would clean them and refill them. However, the flowers were all but gone and I think this gave the moths a window of opportunity. I think this was the cause of my losses.
I started the year with 7 hives. I made all successful splits and increased to 23 hives and 1 NUC - however, I lost a total of 6 hives in the past few months. Leaving me with 17 hives and 1 NUC. If God is willing and I don't loss any hives over the winter, I should be able to divide 17 into 68 or possibly as many as 136 (that would be 4 successful exponential splits).
 My actual goal is 100 hives by the end of next season. So for the rest of the winter, I will be in the wood shop building hives. I'll post on that as I progress.
However, for now my bees are in God's hands - I have done all I can do.
Hive Count: 17 Hives and 1 NUC
Monday, November 5, 2018
Hive Top Feeders - How To Build

In the first picture you can see the finished product. It is simply a 1x4 box with a #8 hardware cloth bottom. Before it goes in the hive, it will be lined with dryer sheets and then filled with cedar chips - hopefully this will keep out pest.
 Now before we get started, I cannot emphasis how helpful Jig's are in the workshop. Because I already had a Jig built for cutting Supers out, I was able to cut up (15) 1x4's in just 15 minutes.
 Later, as I began assembling my outer frames, I was struggling and losing time - until I tacked a board to two sides of one of the assembled boxes and used it as an assembly jig. In the same amount of time it took me to build two boxes without the Jig, I was able to assemble the other (13).
Take the time to build your Jig's - the time you spend building the Jig will pay dividends for years to come.

The required items are:
(2) 1x4's cut 19 7/8" long
(3) 1x4's cut 14 3/4" long
(2) scrap 1x4's cut 5 1/2" long
#8 Hardware Cloth 16" x 23"
"If you would be wealthy, think of savings as well as getting" - Benjamin Franklin
Now I needed to build (15) feeders. I found that if I cut (3) 8'-1x4's I can get (8) 14 3/4" cuts and (8) 19 7/8" cuts with little to no waste. (See Picture)

From (1) 8' - 1x4, I can get (6) 14 3/4" cuts.
So (2) 19 7/8" cuts plus (2) 14 3/4" cuts make the outer box.
Then the (2) 5 1/2" scrap cuts are placed at one end with a gap in the middle.
Then take the third and last 14 3/4" cut and rip (2) 3/8" pieces off long way. (1) strips will be used as a cross bar support for the screen. The other (1) will be cut into (4) even pieces at 22.5 degrees to create the enclosed ladder.
Finally staple in place the #8 Hardware cloth across the bottom and trim off the excess. Then trim that remaining piece to 3" wide.
Now assemble the (4) ladder pieces two on each side and wrap with the hardware cloth leaving a 1/2" exposed on the bottom side for an entrance. Place the ladder in the gap - making sure that there are no gaps that might allow the bees to enter the feeder outside of the ladder.
Now turn the feeder over and cut the hardware cloth out of the 3" x 3/4" hallow space so the bees can access the feeder.
"Winter is Coming" and this coming Saturday will likely be my last chance to slip my feeders on before the temperatures drop into the 50's. Tic-toc, tic-toc.
I hope you find this blog helpful. Please leave a comment if you have any questions.
Monday, October 8, 2018
Beetle Glue Traps Were A Bust
 |
| My friend, Cindy's first visit to a Bee Yard. |
"I didn't fail. I just found 2,000 ways not to make a light-bulb; I only needed to find one way to make it work." Thomas Edison.
On the upside, the fields are filled with Golden Rod and my hives are just a buzzing with activity. I have a feeling that this will be a long cold winter but it hasn't started just yet.
I still have a little honey in the field that needs to be extracted but Saturday it will be 76 degrees for the high, so I think the 35 gallons I extracted is all I'm going to get this year. I'll keep 5 gallons for mead, gifts, and personal use but the other 30 gallons is worth $2400 at $20 a quart. That should be enough to build enough equipment for next year.
At present I can build 63 Hives (that is 1 top, 1 bottom, 1 deep super, & 10 wooden frames) for $851.61. The number 63 is a mystical, spiritual number... just kidding... given the length of the boards vs how many long sides and short sides of the supers you can cut, 63 is optimal number to reduce waste (at least in my wood shop).
It costs me $592 to build 63 supers with 10 frames each (no bottoms or covers).
So 63 Hives with 2 deep supers will cost $1443.61 (plus tax). That's roughly $23 per hive.
I'm really looking forward to getting out in the shop this winter - I think the woodworking is my favorite part of beekeeping.
Well, I checked all the Hives and they are still doing well.
HIVE COUNT: 20 Hives & 1 5FNuc
One last thing: My daughter and Noah (my beekeeping helper) got married this past Saturday 10/6/18. I couldn't be happier!
Thursday, September 20, 2018
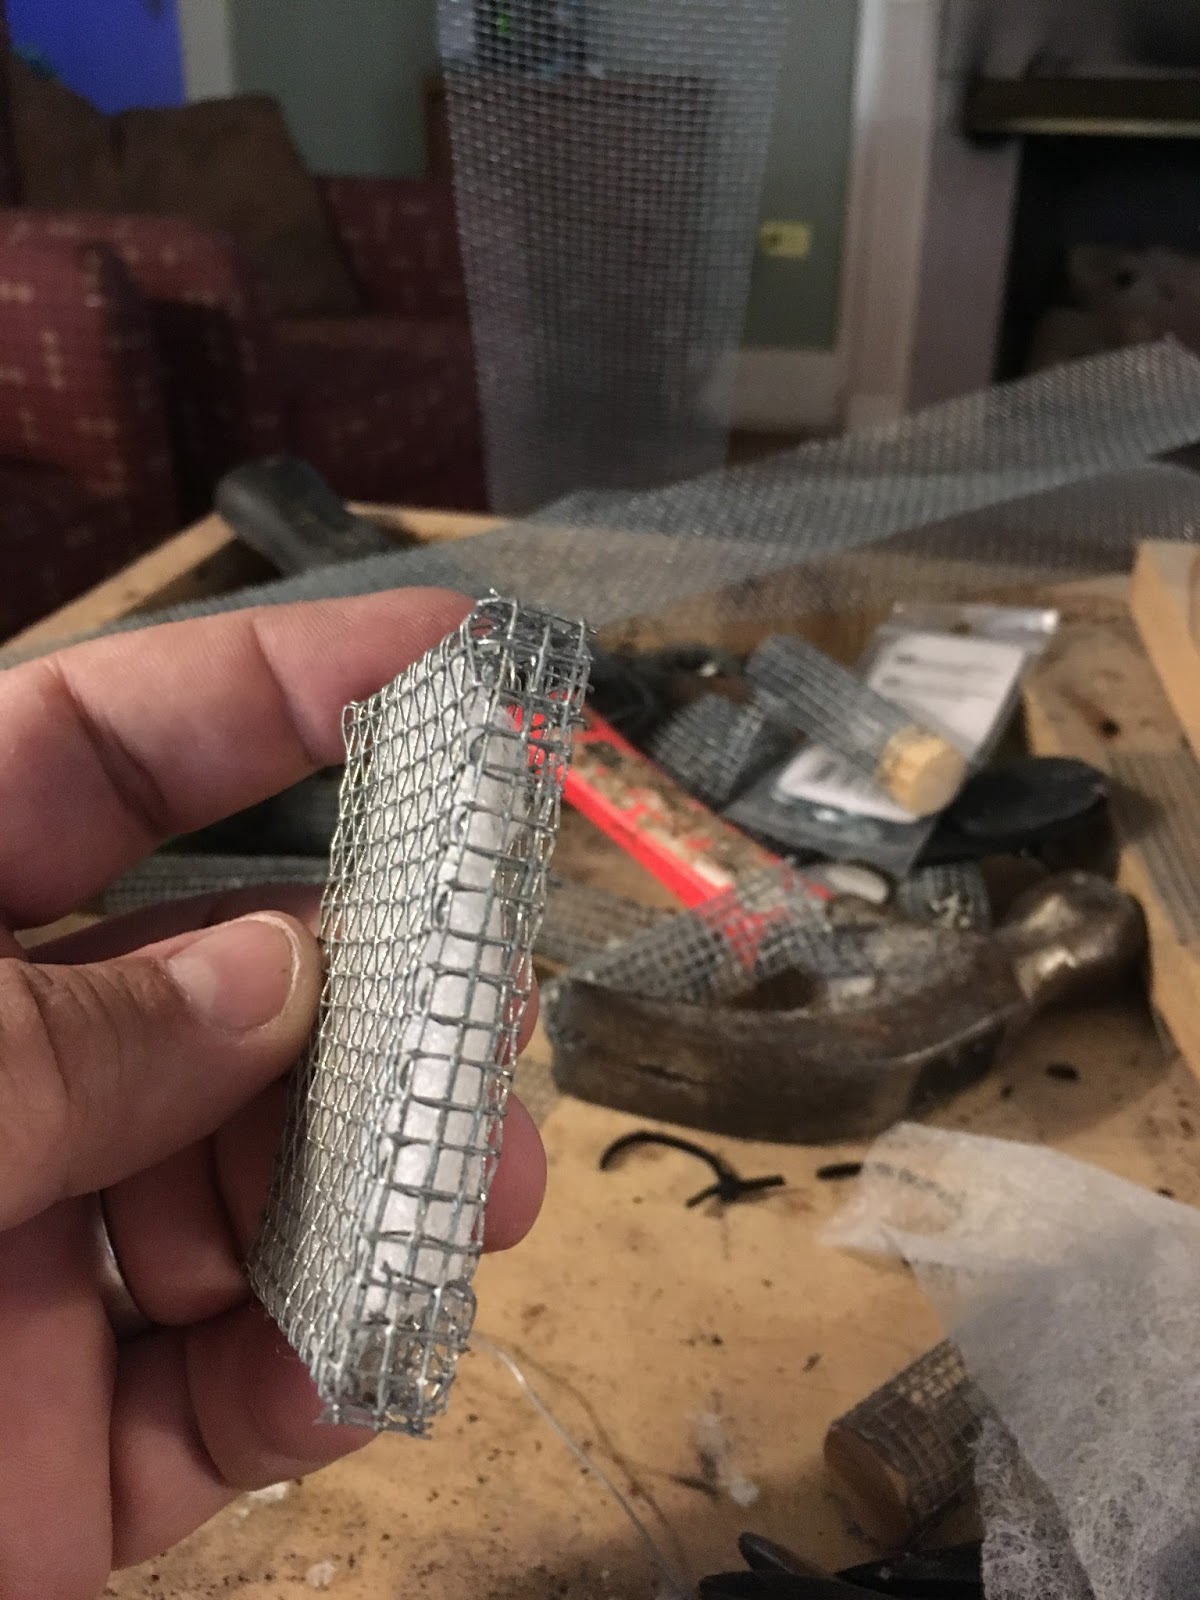
Building A Better Beetle Trap

"Build a better mouse trap and the world will beat a path to your door." - Ralph Waldo Emerson
 Then I made cage around it with #8 hardware cloth and placed a cue-tip inside. I used a syringe to put apple cider vinegar on the cue-tips for beetle bait (BTW it got in my eye and it burned like hell).
I only had time to make 9 Sticky Traps, so I put them in the 9 weakest hives - that being said, all of my hives seem very strong.
It should rain for the next week, so I'll check on the traps after that.

Other Hive Notes:
It was a very hot day (95F) . To be honest, at 400lbs, I was a little worried about the heat but I made it a point to take it slow. Much to my delight, I never got overheated and I was able to check all 20 hives and place a Swiffer Sheet in each one.
A word on my bee jacket: I bought a Ventilated Bee Jacket from Bushy Mountain. I've had 4 other cotton jackets and suits and I got stung through them all! However, this jacket is like Kevlar for bees. I got a little rough with one of my hives and the bees went nuts... but not one of them stung me through my jacket.
I pulled 24 frames of honey from 4 different supers. I found that using a bee brush to remove the bees from each frame works really well. It's not much of a solution for large harvests but while I am just pulling 15 or 20 supers, it works great.
Also, by pulling one frame at a time, I was able to spot the brood and leave it behind - as well as the uncapped frames.
I'm now up to 35 gallons of honey. I plan to reinvest all of the money into building more hives.
I also finally got out to the Old Farm. That one hive is still alive. It was dry out there that day but it is usually very wet (ankle deep). So I think I'll just bring it to my house this winter and never go back to the Old Farm after that.
Final Hive Count: 20-Hives & 1-Five Frame Nuc
Monday, September 17, 2018
Bees, Beetles, and Mosquitoes... Oh My!

The super in the picture is about 13 years old and has been badly
treated. My latest act of malevolence was when I dropped the box about 8" filled with honey to knock out the last of the bees. Not only did this break the ears off of most of the frames but it made, the already weak corners, come apart.
 So I used 1/4 hardware cloth to repair it. The inside lip was also rotting away, so I used the wire to make a new ledge. If it works, great. I'll get another season or two out of the box. If not, nothing lost.
One day, and I hope soon, I will have enough return on my honey investment to buy good wood and plastic frames but until then... waste not, want not.
The 5 frame nuc I made has about 7 to 10 queen cells in it. I moved it out to Dr.D's Saturday. It seems fairly strong and I think it might just make it through the winter - if the beetles don't kill it first.
BEETLES! All of my hives are filled with beetles. Luckily the hives are strong and are keeping them beat down but the beetles are there and just waiting for their chance to destroy the hives.
Wednesday, I will place a swiffer sheet and a Fat Bee-man Trap (though I am not convinced they work) into each hive. I've also broken down and ordered beetle blaster traps for all 20 hives ($48 with S&H) and will put them in as soon as they arrive - they work great but are too pricey.

I think the apocalypse is near and the mosquitoes might be the fourth horseman. I've never seen mosquitoes this bad before. This pictures shows my pants leg but I was covered from head to toe. And it wasn't just out in the country - I must have killed 30 or more in my house that flew in as I came in the front door.
Maybe these incredibly hot days we are having this week will kill them back - I hope so anyway.
Harvest Continues: Well I've harvested 8 deep boxes and have gotten about 25 gallons now. I still have about 12 boxes to go.
Tuesday, September 4, 2018
Loss 13% - Time for Harvest
 "It takes 15,000 casualties to train a major general." - Ferdinand Foch.
I lost 3 of my 23 hives to beetles. Actually, I lost 3 hives to neglect. While the beetles were the final cause, I think that the hives may have swarmed and left the remaining colonies too weak to defend themselves. I could make a 1000 excuses like work, weather, and want... but at the end of the day, I allowed my hives to go two months unchecked.
 Last year I fussed too much with my hives, this year too little. The lesson here is to find the sweet spot - I believe that is about once or twice a month.
To add insult to injury, the tire on my 4x8 trailer came off the rim and, not having any other option, I had to drive home on the rim. Much to my surprise, the rim seems unharmed. I will try to put the tire back on the rim tonight but I may need to buy new tires.
Just the same it was a very productive year. I increased from 7 to 20 hives. I have 20 deep supers of honey to collect and if they are all the same as the one I extracted last night, that will equal 80 gallons or 50lbs per Deep Super.

Which brings me to my new extractor: Honey Keeper Pro Electric 4 Frame Stainless Steel Honey Extractor which cost about $325 on Amazon.
It worked great. It took about 10 minutes to setup. The barrel was bent a little oval'ish when I opened the box but I'm a big guy and I was able to bend it back round. The extractor held 4 deep frames that had to be flipped midway through. One Deep Super took about 30 minutes - of course that was my first try so I am sure I will get much more efficient.
One of the ten frames I extracted was a wood frame with no wires in it. Much to my delight, it did not come apart and extracted without incident.
The drum only held about 4 gallons so that the final extraction caused the honey and wax bits to get stirred and whipped - that is why it looked a little foamy in the bucket picture - it later settled out clear.
 Two other smart purchases I made were:
Honey Strainer Double Sieve for $25 and Honey Uncapping Roller for $13.00
I have spent at least a $100 on cheese cloth over the years. The double sieve is not only cheaper but it was so much easier and cleaner.
As for the uncapping roller - Why does anyone use a hot knife? I have tried a scraping tool which was awful. It made a huge mess and I usually ended up scraping off most of the wax from the frame. I've also used a hot knife and that too was messy. The uncapping roller was extremely clean and effective.
Well I only extracted a single super last night. Tonight I will try to bring home 10 more - assuming I can get the trailer tire fixed. If not, I have a rack on the back of my SUV and it will hold 3 supers.
Hive Count: 20 Hives
Thursday, June 28, 2018
My Cup Runs Over

 I am also happy to say, that I didn't see a single beetle yesterday - not that I looked too hard for them. The heat index was well over a 100 degrees and 1.5 hours was enough to exhaust me completely. Noah is younger and fared better than me but he still looked spent by the end.
We added 11 supers to the hives that needed more room but we needed 13. I'll have to make two more boxes this weekend and wax 20 more frames.
By the way, I bought 13 pounds of wax to coat my old plastic frames. 1 pound of wax is enough to paint 10 plastic frames.
I still have lots of old plastic frames but I have used all but a couple of my old supers. So from here on out, if I want to expand anymore, I'll have to build more equipment.
 Nonetheless, my bees are doing exceptionally well, as are all the aspects of my life. I have just kept my head down and pecked away at the work and God has done the rest.
"Indeed, don’t try to get there at all. It’ll happen when you’re not looking for it." - The Lion, The Witch, and The Wardrobe.
Nothing in life is promised. Yet, I feel optimistic about the future in a very real way. My cup runs over.
Hive Count: 23 Hives
p.s. The moist black wax in the hive I mentioned in the last blog is gone and that hive looks perfectly healthy. Whatever it was has self-corrected.
Monday, April 2, 2018
Checking the Walk-Away Splits

Let's skip the suspense: 13 Healthy Hives but 3 did not make queen cells.
All the splits are full of bees. Three made Queen Cells and Three did not.
Now last year, I labeled the hives A,B,C, etc and then labeled splits with A.1, A.2, B.1, C.1 etc. However, that could get confusing for the reader so I have relabeled them below.
 |
| The colored arrows indicate the original location of the hives and then where the hive-queen was moved to during the walk-away splits. Black arrows indicate queen cell moves. |
I cut queen cells out of Hive-B and put them in A, D, & E. This would have been a perfect correction except that when I removed some of the queen cells, the wax opened on the backside. I immediately placed the cells into their new location but I don't know if the introduction of air into the cells will have harmed the larva.
I'll check them Wednesday. If the Cells look okay then I will leave them be. If not, then I will remove eggs from one of the parent hives and try again.
My beetle traps didn't catch any beetles but there were beetles in the traps. The drier sheets just didn't snag the beetles. I will make some new ones with Swiffer sheets inside and set them Wednesday when I inspect the queen cells.
All and all, my splits look really healthy and the bees seem to have made a fairly even split.
 |
| All the hives were full of bees |
 |
| Hive-D made 3 frames of new wax |
 |
| Queen Cells |
Sunday, March 25, 2018
First Split of 2018 & Big Bryan's Beetle Box
"Necessity if the mother of invention." - Plato
I am an inventor at heart and given my beetle problems last year, I have been trying to build a better mousetrap (beetle trap). Beetle Busters are great but they can get expensive. Fat Bee Man's political sign traps seem reasonable but I still have beetles when I use them. Of course dryer sheets work really well but they seem to kill one bee for every two beetles.
So here is my latest invention. Big Bryan's Beetle Box.

 It is a simple and cheap beetle solution. It's a 3/8" thick #8 hardware cloth box with a dryer sheet inside. This way the beetles can get to the dyer sheet but the bees can't.
I put my first prototypes in the hives yesterday. There were not a lot beetles since all of my hives are so strong but there were still a few. I placed 7 traps in seven hives - 3 of them I poured Apple Cider Vinegar on. I'll let you know how they work next week.
"He also divided the two fish among them all." - Mark 6:41
I split (divided) the six hives at Dr. D's place into twelve. Of course this isn't the first time I made splits but this is the first time I did it with complete confidence.
If you've been following my blog, then you know that last year I made a lot of splits that ultimately failed. But in the words of Thomas Edison, "I haven't failed. I just found 10,000 ways that won't work."
So here is what we did yesterday.

First, we cleaned the apiary up and leveled our concrete blocks.
The next step was to decide on the location of each split. We did our best to put the split as far from the original location as possible - though this is really not that important since the nurse bees will stay with the move and all the workers will go back to the original location.
With the locations decided we began the process. We started with "F" and worked backwards to "A" since "A" had been our most cantankerous hive last year. "F" was also the only hive with only one super.
 I moved the whole hive to location "F1" and then placed an empty supper on the site of "F". I placed 2 frames of eggs, larva, and nurse bees on the "F" site. Then I added a frame of honey and pollen. The rest of the frames were empty waxed frames. I added some empty frames to the "F1" site and closed them up.
 Now I never found a single queen in any of the hives yesterday but I made sure to leave eggs in both hives just in case the queen ended up on the original location.
We repeated the steps for each hive. Since it was very cloudy, it took a long time to confirm eggs were in each frame. The whole process took us 3.5 hours.
Despite the clouds, the bees were fairly docile. Noah got stung 5 or 6 times and I got stung about 7 or more but that isn't really too bad considering the weather.
I will check the splits next Saturday and make sure there are queen cells in all of them.
Now I know you shouldn't count your bees before they hatch but I'm going to.
New Hive Count: 13 Hives
I am an inventor at heart and given my beetle problems last year, I have been trying to build a better mousetrap (beetle trap). Beetle Busters are great but they can get expensive. Fat Bee Man's political sign traps seem reasonable but I still have beetles when I use them. Of course dryer sheets work really well but they seem to kill one bee for every two beetles.
So here is my latest invention. Big Bryan's Beetle Box.
 It is a simple and cheap beetle solution. It's a 3/8" thick #8 hardware cloth box with a dryer sheet inside. This way the beetles can get to the dyer sheet but the bees can't.
I put my first prototypes in the hives yesterday. There were not a lot beetles since all of my hives are so strong but there were still a few. I placed 7 traps in seven hives - 3 of them I poured Apple Cider Vinegar on. I'll let you know how they work next week.
"He also divided the two fish among them all." - Mark 6:41
I split (divided) the six hives at Dr. D's place into twelve. Of course this isn't the first time I made splits but this is the first time I did it with complete confidence.
If you've been following my blog, then you know that last year I made a lot of splits that ultimately failed. But in the words of Thomas Edison, "I haven't failed. I just found 10,000 ways that won't work."
So here is what we did yesterday.

First, we cleaned the apiary up and leveled our concrete blocks.
The next step was to decide on the location of each split. We did our best to put the split as far from the original location as possible - though this is really not that important since the nurse bees will stay with the move and all the workers will go back to the original location.
With the locations decided we began the process. We started with "F" and worked backwards to "A" since "A" had been our most cantankerous hive last year. "F" was also the only hive with only one super.

 Now I never found a single queen in any of the hives yesterday but I made sure to leave eggs in both hives just in case the queen ended up on the original location.
We repeated the steps for each hive. Since it was very cloudy, it took a long time to confirm eggs were in each frame. The whole process took us 3.5 hours.
Despite the clouds, the bees were fairly docile. Noah got stung 5 or 6 times and I got stung about 7 or more but that isn't really too bad considering the weather.
I will check the splits next Saturday and make sure there are queen cells in all of them.
Now I know you shouldn't count your bees before they hatch but I'm going to.
New Hive Count: 13 Hives
Monday, February 26, 2018
2018 First Inspection of Spring

Is there anything more daunting than the first hive inspections of spring? This was the harshest winter since I started keeping bees. Yet, I am happy to report that I only lost one hive. It was the VSH Hive that was full of drones at the end of fall - of course it was expected. What was not expected was how much honey is in my hives.
The VSH hive still had several frames of honey but was being robbed by the other bees, so I took the 20 frames of wax and honey and divided them between the surviving hives.
On hives A, B, C.1, and B.1: I added a super with five frames of wax/honey and five unwaxed plastic frames. I didn't want to give them too much comb to defend against wax moths and beetles.

At home, I moved the fence surrounding my bee yard and, in doing so, doubled the area to about 30'x60'. I plan to move my chickens into this area as soon as it dries up a little - as well as some bees.
The Plan:
The plan is to make a lot of splits this year. The question is, when to start? The weather looks warm and favorable but there is still the Easter cold snap to consider. Nonetheless, as soon as I see drones, I will begin the splits.
I also plan to do hive removals this year to help increase my apiary size.
The Goal:
100 Hives by winter. It's a lofty goal but that's how many I need. The remaining 7-hives will most likely split into 28-hives. The rest will have to come from the bee removals. I, of course, realize the flaw of my goal - but "a man's reach should exceed his grasp, or what is heaven for?" -Robert Browning.
Given how much honey is in my hives after this long harsh winter, I am confident, that I only need one super per hive to survive next winter. I actually feel excited by the thought.
Hive Count: 7-Hives
Monday, February 12, 2018
The Pallet Beehive

I have been making beehives out of old pallets. I've built about 14 now. I had planned on building 100 but the process is just too time consuming.
However, if you are broke and want to get into beekeeping, then this is a way to build something great out of something free.
Now before I get started, there will be a lot of naysayers who will start talking about poisoned pallets and the such. This is not a real issue. In fact, I have used the unpainted type of pallets and have not had one ill-effect from them... well other than possibly Hive Beetles but I fixed that too.
The only three things you need to do to use pallet wood is:
1) Stagger the joints on the front vs the sides. I do this by simply cutting one of the side boards in half longways, and then placing half at the top of the box and the other at the bottom.
 2) Fill in ALL of the gaps. I think failing to do this might have contributed to my hive beetle problem last year. Since the pallet boards are roughly 3.5" wide, it takes three to make one deep box. If done poorly or if the wood is not exactly straight, then there will be cracks. Simply fill these with glue and sawdust.
3) Work from the inside dimensions. Since the thickness of pallet wood is notoriously inconsistent, you have to work from the inside out. This is easier then it sounds. I cut the front/rear boards 14 3/4" long (this ensures the short side is correct).
Then I cut the long sides 19 7/8" - however, when you assemble the box, adjust then end boards to a space of 18 3/8". You may have a little wood sticking out past the ends but it won't be much and will help to keep the stacks even as you add supers later.
 |
| Mabel got cold but refused to quit |
By the way, I already had all my pallets taken apart, so it only took me 2 hours to build 3 deep suppers.
As for me, I think I am going to just start buying lumber. I have a little more money this year than I have had in the past, and so the expense won't be too much of a burden. The time saved will be more than worth it.
The most important thing about this blog, is that I finally got back in the wood shop and back to working towards building my bee business.
Monday, December 11, 2017
Linda Passed Away

I have been overwhelmed as of late. I can't put my finger on the exact cause of this feeling but it is there just the same and it has been crushing my productivity.
Nonetheless, Monday (12/4/17) I finally managed to winterize my hives. It went very well despite working in a light misty rain. However, it was warm and the bees were agreeable.
 I did not merge hives B.1.1 and VSH as planned. I made all the preparations - I reduced B.1.1 to one single super and placed paper over it. However, when I opened the VSH hive it was full of both bees and beetles.
B.1.1 is small and should make it through the winter but I doubted it could survive another beetle attack. So I closed up both hives and left them separated.
Only time will tell if this was the right decision.
On a personal note: My mother-in-law past away on Tuesday (12/5/17). She has been sick for years with a mental condition that mimics dementia and over the past couple of years she had required full-time care. The task was divided amongst my mother, nephew, daughter, son, paid sitters, me, and my wife (the order of those names gives the magnitude of contribution with about 90% of it falling on me and my wife).
It has been exhausting. Her passing feels like a blessing but saying that feels selfish and cold. My wife has now lost both of her parents in the past 18 months and that breaks my heart for her. Just the same, I am sure that the reduced stress of caring for her mom will actually make her life infinitely better - once she has finished grieving of course.
I don't know if my feelings of being overwhelmed are significantly linked to my mother-in-law or if I am just lazy. The weeks to come will answer that question. Either way, 2017 is coming to an end and Spring will be here before you know it.
I have two goals for next year: 100 hives and mastering queen rearing. I think I'll make a chart to hang in the shop and mark off each hive as I build it - then do the same in the spring and mark them off as I fill them with bees.
BTW: My chickens started laying eggs the day before Thanksgiving and I am getting an egg every day now.
Friday, November 17, 2017
Drones at the edge of winter
 |
| Link to YouTube Here |
That's a fitting quote given that my hive is full of sons (drones). This is a heartbreaking event so late in the year.
While doing a little winter preparation, I opened up the first hive (Hive-VSH) and found that it was full of drones. I felt sick. It was also full of beetles. Though neither issue seemed to be effecting the health of the hive - for now.
 I quickly checked the other hives in the yard and they all seemed fine.
Hive-B.1.1, despite having issues earlier, has managed to make a come back but is still a little on the weak side with only about 8 frames of honey.
Without removing any frames I looked for signs of brood but didn't see any. I suppose the queens have quit l
aying for the winter. It was a bad idea anyway but I thought I might stick an egg in Hive-VSH in hopes that they might make a queen before the frost set in.
However, after watching the YouTube video (the picture above is linked) I've decided to merge VSH and B.1.1 together. I was already leaning in that direction but the video pushed me over the edge. So if this causes both hives to die, then I'll blame that YouTuber.
 The weather will be warm and dry again of the Friday after Thanksgiving and so I plan to make that my final visit for the year.
I have taken the next 9 days off from work for Thanksgiving. I plan to use the time to get my wood shop cleaned up (it got pretty disorganized throughout the bee season) and to start building hives for next year.
I also plan to build a new beetle trap and try it out over the winter. I've made a little sketch here.
Next Blog will be on how I merged the two hives. Until then, Happy Thanksgiving.
Monday, October 2, 2017
What if my alpacas get flees and other insane thoughts
 “It is always darkest just before the day dawneth.” Thomas Fuller,
circa 1650
“It is always darkest just before the day dawneth.” Thomas Fuller,
circa 1650
I woke up at 3:30am and my first thought was, “What if my
alpacas get flees?” It would be a reasonable question… If I had alpacas!
It all started partly because my wife is afraid that opossums will eat our beloved chickens. In turn, for the past 2 or 3 months, every morning I am forced to hump the chickens out
to their pen and every night I have to drag them back in to the brooder. Mind you, the chickens are fully grown.
So I researched chickens and that led me to Justin Rhodes’s farm video tour, who did a video about a family that raised sheep, to get the wool, to spin the yarn, to knit the hats… In The House That Jack Built.
So I researched chickens and that led me to Justin Rhodes’s farm video tour, who did a video about a family that raised sheep, to get the wool, to spin the yarn, to knit the hats… In The House That Jack Built.
That sounded really interesting, so on a whim I looked up wool and that led me to alpacas who turn out to be great guard animals for… wait for it… chickens!
We won’t be getting alpacas. I live in town and the bees and
the chickens are already pushing the limits of the city ordinances. I give the neighbors honey (and eggs when they start laying) but not a lot of people would be swayed with the gift of an alpaca fleece. However, one day when we buy a
place in the country… well… who knows.
Here in the real world:
 Noah and I visited both of the apiaries Saturday and all the bees are doing well.
I also added an empty super of freshly waxed frames to Hive-B.1.1 - that gives all the hives two deep supers at Dr. D's.
Noah and I visited both of the apiaries Saturday and all the bees are doing well.
I also added an empty super of freshly waxed frames to Hive-B.1.1 - that gives all the hives two deep supers at Dr. D's.I harvested a deep super of honey from the old farm. The odd thing was that there were supersedure queen cells in that hive – though they seemed a little old and there was still plenty of brood. I think it's okay.
I’ll still need to winterize the hives this month but for
now, it is still in the 80’s and the goldenrod is in bloom.
Final Count – 8 hives.
Monday, September 11, 2017
The Magnificent Seven
 |
| Hive-B.1.1.VSH |
I'm down to (8) hives; one at the old farm and seven at Dr. D's. However, three of those hives are from recent splits. Given my recent loses, I've been obsessing over these remaining hives. The thought wakes me up at night and I imagine empty hives that look like the ruins of bygone civilizations.
The trouble is that with this project still only a side venture, it's priority often slips down the list. So when I finally got out to Dr. D's this weekend, I was nearly sick with worry. However, it turned out to be the best beekeeping day of the year.
For starters it was a pleasant 85͒ and sunny. Given how hot it's been this year, this felt like air-conditioning.
However, what made the trip so wonderful was how well all the bees were doing.

 Hive-A has filled six of the ten re-waxed frames with honey.
Hive-B was full but didn't show any signs of swarm cells, so I added a box of re-waxed frames.
Hive-C.1 had three boxes so I harvested a box of honey, leaving two supers.
Hive-C (like Hive-B) was full but didn't have any swarm cells, so I added a box of re-waxed frames.
Hive-B.1 & Hive-VSH both had lots of activity so I didn't open them.

Hive-B.1.1.VSH, despite previously being overrun by beetles, has snapped back. It has a beautiful queen that is laying like crazy and the bees have filled six frames with brood, pollen, and honey.
All seven hives are doing really well. In fact, next year, I plan to make splits in mid-August since the bees seem to have so much to forage.
 Re-Waxing Frames:
I mentioned that I put re-waxed frames in the hives. I've mentioned this before but bees WILL NOT build on bare plastic frames. They have to have a thin coat of wax on them. "How thin?" is the question.
I melted what little wax I had in a metal pan and added two parts water. Then I did my best to stir the mixture as I worked to make the wax as thin as possible. However, I am not sure the water actually mixed with the wax.
The first (13) frames worked out perfectly. Each took just enough wax to highlight the printed comb pattern. However, the last seven frames had mostly water but it gave the frame a slightly tacky feel - Hopefully this was enough wax to get the bees started.
To see if it works, I marked each frame with either "Good Wax" or "Wet Wax". I placed the good frames in the middle of the hive so that the bees could fill these first but hopefully they will fill them all.
End of the year:
I only plan to open the hives two more times this year. This weekend I will go back to Dr. D's and gather all of my hive top feeders. After I caulk the inside of them, I will fill the void with diatomaceous earth and cedar chips.
I will then return to Dr. D's to set the hives up for winter. I will place a feeder on each hive as well as an unscented swiffer pad on each the bottom board. Finally, I will dock the front entrance up so that there is only about an inch of open space. With that, I will say a prayer, and wait for Spring. I'll still visit the hives once a month to heft them and feed them if need be but other wise, the season is over.
Subscribe to:
Posts (Atom)